
Add These Marble Nail-Art Designs To Your Monsoon Mood-Board RN

My commitment to minimalistic nail-art is wavering. Though I’ve always favoured a play of neutral-toned colours like white, beige, and peach, I’m contemplating revamping my mood-board a little—courtesy of marble nail-art.
It’s the layering, stacking, and toppling of colours over one another that discouraged me from trying my (shaky) hand at it; but I decided to give it a go, and I was surprised by how gorgeous—and marbled—my nails looked. And that’s why I’m putting together an assortment of the simplest marble nail-art designs to start off with—along with how to do marble nail-art as well as nail-polish products.
How to Create Marble Nail-Art Designs At Home
This manicure might look tricky to recreate but it’s extremely simple to replicate. Here’s a line-up of the best marble nail-art—from minimal to dramatic, choose whichever calls to you. And check out the marble nail-paints we have lined up for you!
What You’ll Need
Here’s what you must have at your disposal to recreate marble nails.
Base Colour: You don’t have to restrict your base to a certain colour—work with whatever you like. Let’s select black for this example.
Texture Colour: This shade has to be a little lighter—one or two shades lighter—than your base. Grey, for instance, pairs well with black.
Detail Colour: This colour must pop because you’re going to be doing all the embellishing with it—shades like white or yellow contrast grey and black flawlessly.
Metallic Colour: Pick a colour that goes well with your detail colour. They must complement each other. Think colours like gold.
A Fine, Thin Brush: You’ll need a brush to draw all the details on your nails.
Plastic Wrap: This one’s for all the mixing that’s going to happen.
Top Coat: You need to seal the manicure in with a final top-coat.
A Step-By-Step Breakdown
Set The Base: Do two coats of black, and make sure you’re covering every inch of your nail. This is your backdrop.
Add Some Texture: This is where your plastic-wrap comes into play. Take some of the wrap, and fist it into a ball. Drop a little bit of the base as well as texture colour (grey and back) onto a clean, flat surface, and gently, press the ball-shaped wrap into the colours. Next, roll the pigment onto your nails softly. This will create a textured finish.
Throw In Some Detail: It’s time to bring out the brushes—more like brush. Dip the brush into your detail colour—white or yellow—and start drawing random lines on your nails. They don’t have to follow a definite pattern. You can dilute the brush with acetone to avoid creating harsh, obvious lines. You want them to look seamless.
Bring In The Shine: Using your metallic colour, draw some accents around the squiggly lines.
Clean It Up: With a small, thin brush and a nail-polish remover, clean the edges of the nail.
Apply Your Top Coat: Apply a single layer of your top-coat, and you’re good to go.
10 Of The Best Marble Nail Art Designs
No Lack Of Black

This one’s a lot like the example demonstrated above—black makes the base, and swirls of white embellish the nail. You can throw in a couple of streaks of grey as well. This is simple yet fancy-looking.
Use: MyGlamm 2in1 Nail Paint - Casino Night


Double Trouble

How about playing around with two designs? Notice the grey-white duo complementing the black-gold combination.
Use: MYGLAMM LIT NAIL ENAMEL - CHEAP THRILLS


White N Brown

Keep some of your nails plain, and marble the rest of them. These colours contrast each other effortlessly—notice how the streaks of milky-white (punctuated by metallics) form a watercolour-like effect.
Use: MANISH MALHOTRA NAIL LACQUER - BLONDE MUSE


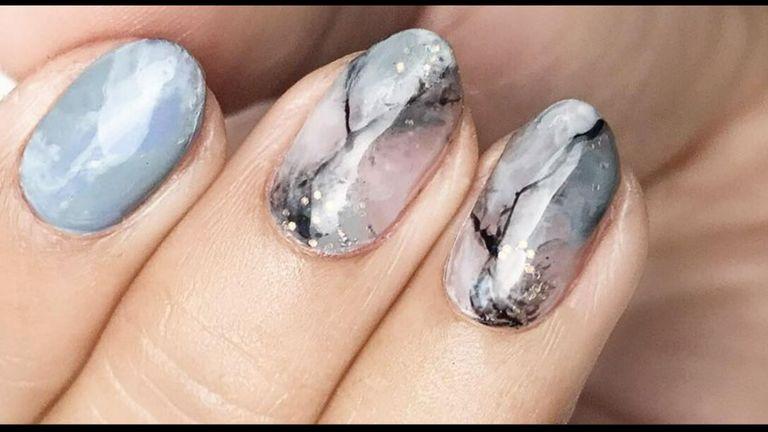
Is It Wednesday?

The best part about marble nail-art is that it works on short as well as long nails. And if you don’t want to marble all of your nails, you can create the design on your tips only. Notice the play of white and pink in this photo. If you were looking for pink marble nails, this is it for you.
Use: MYGLAMM LIT NAIL ENAMEL - BABE


True Blue

Just colour your nails blue, and add some squiggly lines of white all over. Don’t forget to dilute the white for it to blend into the base seamlessly.
Use: MyGlamm LIT Nail Enamel - Bad Romance


Purry Purple

Start off with a light shade of purple as the base for one of your nails, and add it in a little bit of white. Add a glitter-laden purple to two of your nails, and a darker shade of purple to the last.
Use: MYGLAMM TWO OF YOUR KIND NAIL ENAMEL - WINE TASTING
Chocolate Browns

For this design, you’ll need a couple of browns—chocolate brown, dark brown, and something beige. Marble just one of your nails—set the base with beige, and embellish it with strokes of darker brown. And, there, you’re done.
Use: MyGlamm LIT Nail Enamel - Bang On
Cloudy Skies

White marble nails FTW! How about setting white as your base, and topping it up with blue? This is much like the white-blue design from before—just the roles have been swapped.
Use: Manish Malhotra Beauty By MyGlamm Gel Finish Nail Lacquer-Coconut Kiss


There’s No Or—Just Orange.

Add a pop of colour to your nails with a shade of orange, and tie in the lightest shade of white before concluding golden streaks.
Use: MYGLAMM LIT MATTE NAIL ENAMEL - TURNT


Glittery Galaxy

A galaxy? How can you say no? Layer your nails with a glittery navy-blue, and mix in some white as well as purple to conclude the look.
Use: MANISH MALHOTRA NAIL LACQUER - MIDNIGHT MUSE
Also Read
Ombre Nail-Art Designs: Have you always been fascinated by how gorgeous this form of nail-art is? Now—you can recreate it at home! Here’s how.
French Manicure Nail-Art Designs: Though the French Manicure is minimal and understated, there are so many ways you can tweak the style to pay homage to your dramatic alter-ego. This line-up demonstrates how.
Bridal Nail-Art Designs: Bride-to-be, don’t overlook the importance of a manicure on D-day—your look isn’t complete without swirls of paint drenching your nails, and that’s why we’ve rounded up some of the best nail-art designs for you to add to your bridal mood-board ASAP.
Black And White Nail-Art: You don’t have to add pops of yellow to your nail-art for it to pop—black-and-white is the way to go. From minimalistic to dramatic, here’s all the inspo you need to recreate a monochromatic aesthetic.
Pink And Black Nail-Art: But if you’re all about adding pops of colour to your look, think about the different ways you can pair pink with black—or take cues from our line-up, and add them to your mood-board ASAP.
Nail-Art With Glitter: All that glitters isn’t golden—but it feels like it when your nails are sparkling. Here’s how you can play around with glitter for your nails.
Gold Nail-Art Design: From painting your nails golden to adding a sliver of the colour to your nails, here’s how you can work this colour into your manicure.
- Red Bridal Nail Art: Here’s the red bridal nail art for you to make your red bridal look complete.
- Nude nail art design: Do you know you can be very creative with your nude nails? Try using these nude art design and turn the your nude nails to creative one.
-(1)_6.jpg)


